user manual
The GPS in Micro Flight was made to resemble the Magellan 315 GPS which is very popular among pilots, sailors and land navigators.
The GPS operates as an autonomous navigation unit when no glider is selected and as the navigational GPS when glider is selected.
This means that waypoints and path can be shown on the GPS regardless of the path flown by any glider, and also waypoints may be created and assigned regardless of any selected glider.
But when a glider is selected the GPS is mounted on this glider, and selecting goto and waypoint assignments will apply to the selected glider as well.
Using this GPS and the ability to show real USGS scenery and aerial photography, give Micro Flight an added value as a navigational training aid.
Land vehicles are also simulated in Micro Flight, using them with the GPS can simulate land navigation as well.
| Disclaimer : this GPS is simpler than the actual one, this program is not intended to show the full functionality and data which exists in the real one and cannot be used as a basis for GPS comparoson and evaluation. |
Press P or joystick button 4 to display the GPS, this will show one of the following screens:
 screen 1 |
 screen 2 |
 screen 3 |
 screen 4 |
 screen 5 |
 screen 6 |
 screen 7 |
Operating the GPS is done by pressing the buttons on it and selecting the menu commands that it can display.
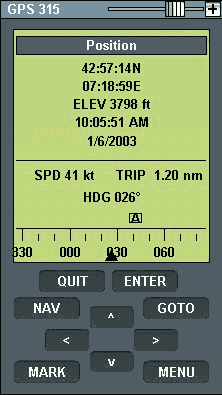
The GPS has five navigation screens which show data about the current position and the navigation in progress.
The GPS can be used instead of the map to interact with waypoints and routes, and provides a realistic way to navigate the scene.
The size of the GPS can be changed by pressing ^ v buttons, in to accomodate less space and keep the main view as clear as possible.
Detailed explanation of actual GPS operation is beyond the scope of this help file and can be found on the further reading section below.
GPS buttons:
- Nav - displays the next GPS screen, if pressed when menu is active acts as Quit.
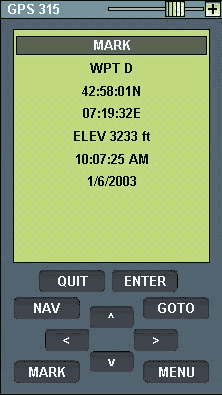
- Mark - marks current position as a new waypoint, shows screen 5.
- Goto - selects the next waypoint to be used, shows screen 6.
- Menu - displays the menu of GPS functions, shows screen 7.
- Quit - cancels the current menu or mark command, the current GPS screen is restored.
- Enter - accepts the current menu or mark command.
- < - zoom in in map screen 4.
- > - zoom out in map screen 4.
- ^ - increase the GPS screen size.
- v - decrease the GPS screen size.
GPS commands:
- Clear goto - clears the next waypoint selection.
- Delete wpt - deletes the last waypoint.
- Elapse reset - resets the elapsed time counter.
- Trip reset - resets the trip distance counter.
- Clear track - clears the track stored in GPS and in selected glider.
- Clear all - clears the tracks, waypoints and counters.
Further reading:
See the manual of this GPS and more at Magellan product support